Everything you need, in one place.
From install to payroll. Skim the sidebar for the section you want, or read top to bottom — it’s about a 15-minute walkthrough.
Install on Your Phone
ClockOut works like a regular app on your phone — no app store needed. Pick your browser below and follow the steps.
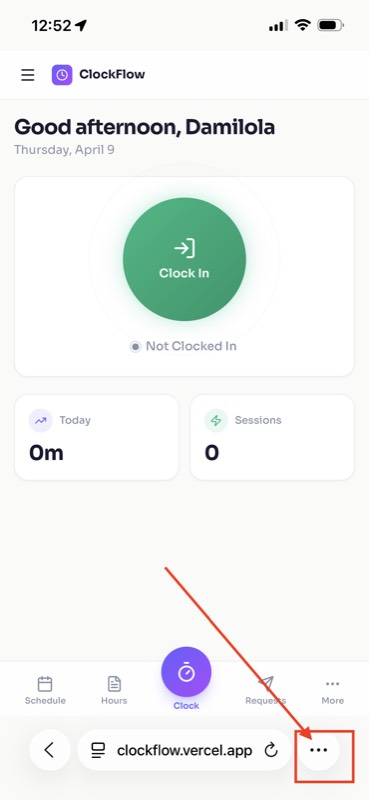
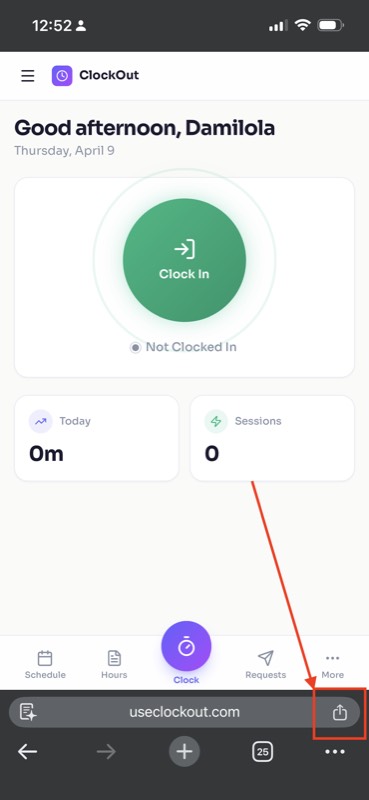
Open your ClockOut link in Safari. Tap the ⋯ menu button in the bottom-right corner.
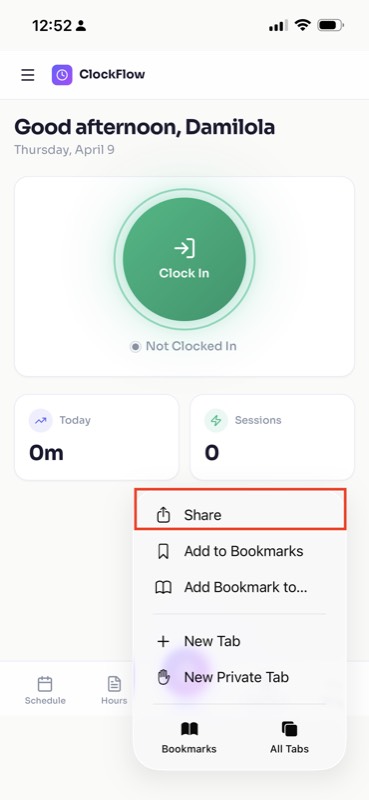
Tap Share from the menu that appears.
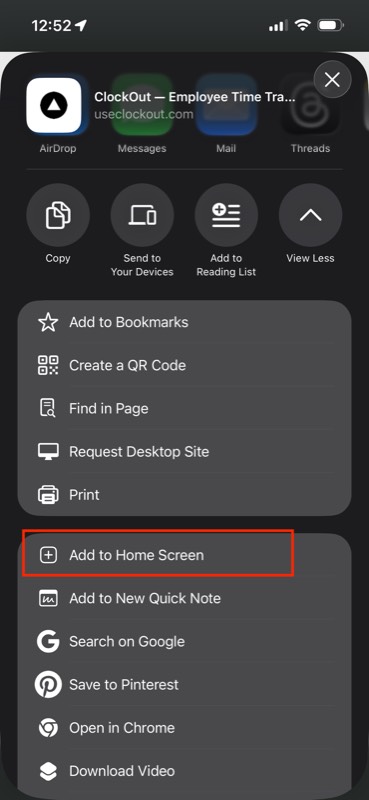
Scroll down and tap "Add to Home Screen".

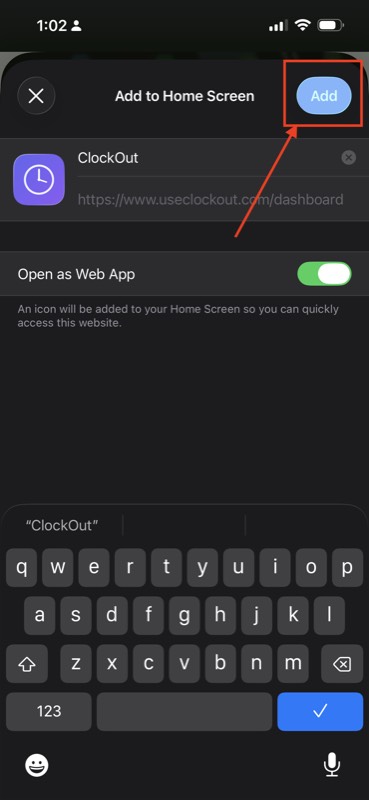
Tap Add in the top-right corner. You can keep the name as "ClockOut".
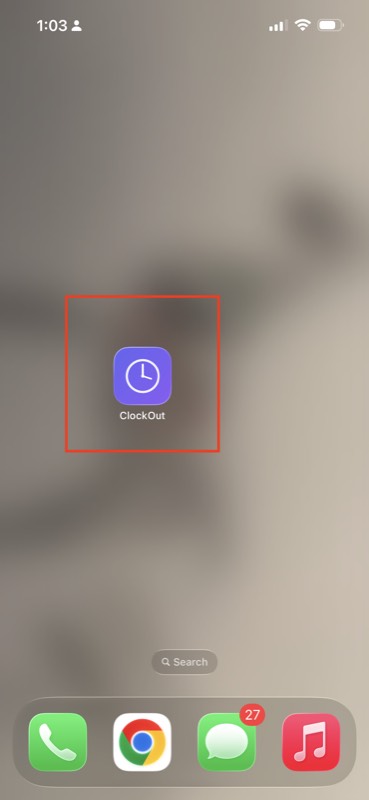
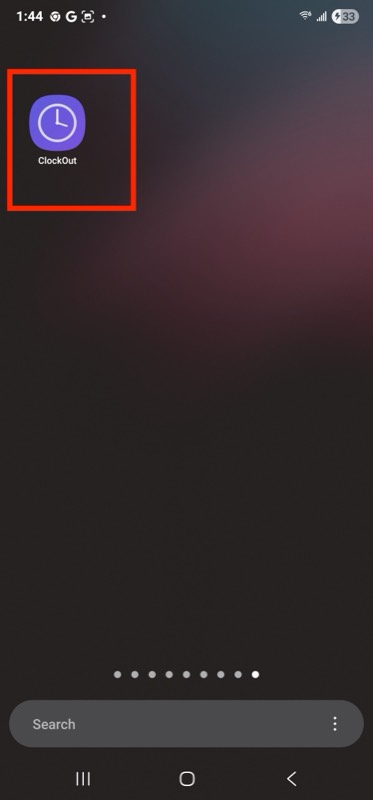
The ClockOut icon will appear on your home screen — just like a regular app.
Tap the icon to open ClockOut in full-screen mode — no browser bar, just the app.
Open your ClockOut link in Chrome. Tap the share icon in the bottom-right of the address bar.
Scroll down and tap "Add to Home Screen".
Tap Add in the top-right corner. You can keep the name as "ClockOut".
The ClockOut icon will appear on your home screen — just like a regular app.
Tap the icon to open ClockOut in full-screen mode — no browser bar, just the app.
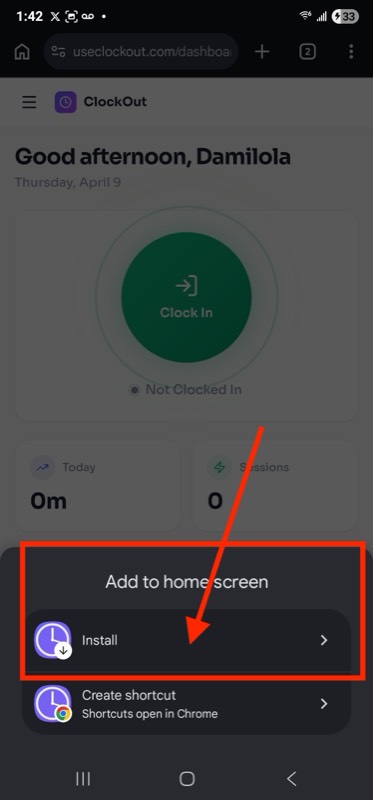
Open your ClockOut link in Chrome. Tap the three-dot menu ⋮ in the top-right corner, then tap "Add to Home screen".

Tap Install to add ClockOut as an app on your phone.
The ClockOut icon will appear on your home screen. Tap it to open the app.
Admin Setup Admin
After you register your company, you'll see an onboarding wizard that walks you through the basics. Here's the full setup guide.
1. Set Your Timezone
Go to Settings and pick your timezone. This affects when "today" starts and how clock-in times are recorded. Get this right first — all dates and times throughout the app use this timezone.
2. Set Pay Rules
In Settings, configure:
- Pay Period — weekly or bi-weekly
- Overtime — hours per week before overtime kicks in (usually 40) and the multiplier (usually 1.5x)
- Rounding — round clock times to nearest 5, 15, or 30 minutes
- Auto Clock-Out — if someone forgets to clock out, the system closes it after this many hours
- Break Compliance — require employees to take a break after a set number of hours
3. Set Up Geofence Starter
Two options for location enforcement:
Option A: Single location — In Settings → Geofence, toggle it on and click "Use my current location" while at the workplace. Set the radius (200 meters works well).
Option B: Multiple locations — Go to Locations and add each workplace with its own name, coordinates, and radius. Employees can clock in from any active location.
4. Add Your Employees
Two ways to add people:
Option A: Add them yourself
- Go to Team
- Click Add Employee
- Enter their name, email, role, and hourly rate
- ClockOut emails them a one-time account setup link
- They open the link and create their own password
Option B: Send an invite link
- Go to Settings — you'll see your invite code
- Click Copy Link and send it to your employee
- They open the link, enter their name, email, and choose a password
- They're in! You can then set their hourly rate in Team
5. Set Up Schedules
- Go to Schedules
- Click Add Shift
- Pick an employee, set the start/end time, and select which days
- Click the copy icon on any shift to duplicate it for another employee
You can also post open shifts Starter — these show up for all employees and anyone can claim them.
6. Set Up Recurring Schedules Starter
Go to Templates to set up weekly recurring shifts. Pick an employee, choose the days of the week, and set the times. The system automatically generates next week's shifts every day.
7. Add Holidays
Go to Holidays to add company holidays. These show up on everyone's schedule view with a special icon.
For Employees Employee
Clocking In & Out
Open the app and tap the big green Clock In button. That's it. When you're done, tap the red Clock Out button.
- Your location is recorded when you clock in — it's shown as a readable address (e.g., "Oak Avenue, Downtown") in the app
- You'll see a live timer showing how long you've been working
- If you clock in late, you may be asked to provide a reason
Taking a Break
While clocked in, tap Start Break. The timer pauses. Tap End Break when you're back. Break time is tracked separately and doesn't count toward your hours.
Viewing Your Schedule
Go to Schedule to see your shifts for the week. Holidays are shown in yellow. Use the arrows to look at other weeks.
Viewing Your Hours & Pay
Go to Timesheet to see:
- Your hours worked each day (with a visual bar chart)
- Your estimated pay — regular and overtime
- A detailed log of every clock-in/out
Requesting Time Off
- Go to Requests
- Tap New Request
- Pick the dates, type (vacation, sick, personal), and add a note
- Submit — your admin will approve or deny it
- You'll get a notification when it's reviewed
Fixing a Mistake
Forgot to clock in? Clocked out at the wrong time?
- Go to Requests → Corrections
- Tap New Request
- Pick what happened, enter the date and correct times
- Your admin will review and fix it
Open Shifts Starter
Check Open Shifts to see if your manager posted any available shifts. Tap Claim to add one to your schedule.
Monthly Attendance Pro
Go to Attendance to see a monthly summary: days worked, days absent, late arrivals, and total hours.
PTO Balances Starter
Go to PTO Balances to see how much paid time off you have available. You'll see:
- Available hours for each PTO policy (vacation, sick, personal)
- How much you've accrued and used
- Any company blackout dates when PTO can't be taken
When your time-off request is approved, your balance is automatically deducted. If you cancel, it's restored.
Availability Starter
Go to Availability to set your preferred working hours. For each day of the week, you can:
- Mark yourself as available or unavailable
- Set your preferred start and end times
- Set a max weekly hours preference
Your manager sees this when creating the schedule and will be warned about conflicts.
Submitting Your Timesheet Starter
If your company requires timesheet approval, you'll submit your hours each week for manager review. Go to Timesheet and tap Submit for Approval. You'll be notified when it's approved or if it needs corrections.
Notifications Starter
ClockOut sends notifications three ways: in-app (bell icon), email, and phone push notifications.
You'll be notified when:
- Your time-off request is approved or denied
- Your correction request is reviewed
- You're approaching overtime for the week
- You have an upcoming shift (1 hour before)
- Your next-day schedule is posted
- You missed your scheduled clock-in (15 min after)
- You may have forgotten to clock out
- You were auto clocked out by the system
- Your timesheet is approved or rejected
Push Notifications (Phone Alerts)
To get real-time alerts on your phone — even when the app isn't open:
- Install ClockOut on your phone (see Install on Your Phone above)
- Open the app and log in
- You'll see an "Enable push notifications" prompt on the dashboard
- Tap Enable and allow notifications when your phone asks
Managing Your Team Admin
Live View
See who's clocked in right now, who's on break, who's late, and who's off today. This updates in real-time.
- Late badge — shows when someone clocked in more than 5 minutes after their scheduled start
- Break needed badge — shows when someone has worked past the break requirement
- Location — shows the address where they clocked in from (e.g., "Main Street, Springfield")
- Off Today section — approved time-off for the day
- Late reason — if the employee provided one, it's visible here
Approvals
Go to Approvals to review pending time-off requests, corrections, and shift swaps. Tap the green check to approve or red X to deny. The employee gets a notification with the result.
Timesheet Approvals Starter
Go to Timesheets to review employee-submitted weekly timesheets. You can:
- Approve — confirms the hours are correct and ready for payroll
- Reject — sends it back with a reason; the employee can fix and resubmit
Exception Inbox Starter
Go to Exceptions to see attendance problems detected automatically:
- No-show — scheduled but didn't clock in (30+ min late)
- Late arrival — clocked in after scheduled start
- Early leave — clocked out 30+ min before schedule end
- Break violation — worked past the required break threshold
- Auto clock-out — forgot to clock out, system closed it
For each exception, you can acknowledge, resolve, or dismiss it. Use the checkboxes for bulk actions.
Availability View Starter
When creating schedules, you can check each employee's availability preferences. The system warns you about conflicts — time off, holidays, availability blocks, and weekly hour limits — before you publish.
Notifications Starter
As an admin, you'll be notified when:
- An employee submits a time-off or correction request
- An employee clocks in late without a reason
- An employee is approaching overtime for the week
- An employee submits their weekly timesheet
- A compliance rule is violated (daily overtime, max hours, etc.)
Payroll Admin
Viewing the Report
Go to Reports to see the weekly payroll summary. It shows every employee with their:
- Total hours worked
- Overtime hours
- Hourly rate
- Estimated pay (regular + overtime)
All employees show up — even those with zero hours that week.
Exporting
Two export options at the top of the Reports page:
- CSV — downloads a spreadsheet for Excel, Google Sheets, or your payroll provider
- PDF Pro — downloads a formatted PDF report
Payroll Runs Pro
For formal payroll processing, go to Payroll instead of Reports. Payroll runs give you a durable record:
- Create a pay run for a date range (e.g., the pay period)
- Preview the calculated hours and pay for each employee
- Approve the run when the numbers look right
- Lock — takes a permanent snapshot of the data (entries can't change the numbers after this)
- Export — download in your payroll provider's format
Export formats available: Standard CSV, ADP, Gusto, QuickBooks. You can reopen a locked run if you need to make corrections.
Understanding Overtime
Overtime is calculated automatically based on your settings. The default is anything over 40 hours per week at 1.5x the hourly rate. You can change both numbers in Settings.
Understanding Rounding
If you set rounding to 15 minutes, a clock-in at 9:07 AM counts as 9:00 AM, and 9:08 AM counts as 9:15 AM. This is applied to pay calculations, not to the displayed times.
PTO Management Starter Admin
Set up paid time off policies so balances are tracked automatically.
Creating Policies
Go to Settings or manage PTO from the admin area. Create policies like:
- Standard Vacation — accrues 10 hours/month, max 120 hours, 40 hours carryover
- Sick Leave — accrues 4 hours/month, no carryover
- Personal Days — yearly grant, use-it-or-lose-it
Each policy has an accrual rate (monthly, biweekly, or yearly), a max balance cap, and carryover rules.
Assigning Policies & Adjusting Balances
Assign policies to employees and optionally set an initial balance (e.g., for mid-year hires). You can also manually adjust balances with a reason logged in the audit trail.
Blackout Dates
Add blackout date ranges when PTO requests won't be accepted (e.g., holiday season, inventory week).
How It Works With Time Off
When you approve a time-off request, the matching PTO balance is automatically deducted (business days x 8 hours). If the employee cancels, it's restored. If the balance is insufficient, the approval is blocked.
Exception Inbox Starter Admin
The exception inbox automatically detects attendance problems so you don't have to hunt for them. The system checks every 30 minutes and flags:
- No-shows (high severity) — scheduled but no clock-in after 30 minutes
- Late arrivals (low/medium/high based on how late)
- Early leaves (medium/high based on how early)
- Break violations — worked past required break threshold
- Auto clock-outs — system closed a stale entry
Filter by status (open, acknowledged, resolved, dismissed) and use bulk actions to clear your queue.
Kiosk Mode Starter Admin
Set up a shared tablet at your workplace entrance for employees to clock in/out with a PIN — no personal device or login needed.
Setup
- Go to Kiosk in the admin menu
- Toggle kiosk mode on
- Assign a 4-6 digit PIN to each employee
- Open the kiosk URL on a shared tablet or browser
The kiosk shows a number pad. Employees enter their PIN and are automatically clocked in or out. A confirmation screen shows their name and the action taken.
useclockout.com/kiosk/your-company-slug.Compliance Rules Pro Admin
Configure labor law compliance rules that are automatically enforced. Go to Compliance in the admin menu.
Available Rule Types
- Meal Break — require a meal break of X minutes after Y hours (e.g., CA law: 30 min after 5 hours)
- Rest Break — require a rest break after a set number of hours
- Daily Overtime — flag when an employee exceeds X hours in a single day
- Max Hours/Day — hard cap on daily hours with a notification
- Max Hours/Week — weekly hour cap
- Consecutive Days — alert when an employee works more than X days in a row
Violations are flagged as exceptions and appear in the Exception Inbox. Admins also receive notifications for critical violations.
Attestation & Signatures
For auditable records, employees can digitally sign off on time edits, weekly timesheets, and payroll runs. Signatures are stored with a timestamp and statement.
Tasks & Document Sharing Starter
Assign to-dos to specific employees (or leave them unassigned for anyone to grab) with a due date, priority, and an optional document link.
Creating a task Admin
- Go to Tasks in the admin menu
- Click New Task
- Add a title, description, priority (low / normal / high), due date, and optionally an assignee
- Paste a document URL (Google Doc, Dropbox link, anything) so the assignee has the reference they need
The assignee gets an in-app + push notification. Admins see all tasks grouped by status: Open, In Progress, Done, Cancelled. Overdue tasks show a red due-date pill.
Working a task Employee
Open the Tasks page from the sidebar. Tap the status to flip it from Open → In Progress → Done. Marking a task done stamps a completedAt timestamp.
Workplace Announcements Starter
Post company-wide notices that show up on every employee's dashboard — without another Slack channel.
Posting an announcement Admin
- Go to Announcements in the admin menu
- Write a title and body
- Optionally pin it (pinned items always sort first) and set an expiry date for time-sensitive notices
When you post, every active employee gets an in-app notification and a push notification. The latest unread pinned announcement also shows as a banner on their main dashboard.
Reading announcements Employee
The Announcements feed shows pinned items first, then most recent. Click any item to mark it read, or use Mark all read.
Tips Tracking Starter
For tipped roles. Employees log daily tips by source; admins see totals by employee and date range and can export to CSV.
Logging tips Employee
Open Tips. Pick a date (defaults to today), enter the dollar amount, choose a source (Cash, Card, Pool, Other), and optionally add a note. Edit or delete past entries any time.
Two summary cards show this week and this month totals.
Reporting Admin
Open Tips Report. Pick a date range (defaults to current week). You'll see:
- Grand total tips for the period
- A breakdown by employee (total + entry count)
- A daily totals bar chart
- A Export CSV button
Skills & Certifications Pro
Track licenses, food-handler cards, OSHA, CPR, or any company-defined skill — with expiry alerts so nothing lapses unnoticed.
Building the catalog Admin
Go to Skills. Create entries with a name, type (Skill or Certification), and optional description. Archive ones you no longer use.
Assigning to employees Admin
From the same page, the Assignments table lists every employee with their current skills/certifications. Click a row to add or edit, including:
- Attained date — when they earned it
- Expiry date — when it lapses (optional)
- Document URL — link to the certificate file
- Notes — anything extra
Expiry alerts
A daily cron scans for any user-skill expiring within the next 30 days. The employee and all admins/managers receive a cert_expiring notification. Each item is alerted at most once per week so you don't get spammed.
Employee view Employee
Open Skills. Each card shows the name, kind, attained date, and an expiry pill: muted (>30 days), amber (8–30 days), red (≤7 days), red+strikethrough (expired). Use the Request to add form to nudge admins about a missing skill — it sends them a notification.
Labor Budget & Forecasting Pro Admin
Set a weekly target — hours, dollars, or both — and watch projected vs actual cost as you build the schedule.
Setting a budget
- Go to Labor Budget in the admin menu
- Pick a week (Mon-start). Use Today / prev / next to navigate
- If you have multiple locations, pick one (each location can have its own target)
- Enter a target hours and/or a target dollar cost for the week. Save.
Reading the comparison
Two progress bars show:
- Hours — total scheduled hours for the week vs your target
- Cost — projected cost (sum of hours × hourly rate) vs your target dollar budget
Bars are green up to 90%, amber 90–100%, red over 100%. A breakdown table shows every employee's scheduled hours and projected cost so you can spot the over-spenders.
Shift Confirmation Starter
Make sure scheduled employees actually saw and accepted their shift — and get a heads-up if they didn't.
Confirming or declining Employee
On My Schedule, every shift you haven't responded to yet shows small Confirm and Decline buttons. Decline asks for a quick reason. Confirmed shifts show a green check; declined ones go muted with an X.
Reminders
An hourly cron looks at shifts starting in the next 24 hours that have neither a confirm nor a decline. Anyone with an unconfirmed shift gets a single reminder (in-app + push).
Admin visibility Admin
On the admin Schedule grid, every shift block carries a status indicator: ✓ confirmed (green tint), pending dot (default), or ✗ declined (red tint, with the decline reason in the tooltip).
Plans & Billing
ClockOut has three plans. Features locked behind a plan show a purple badge in the sidebar.
| Feature | Free | Starter $3/emp/mo |
Pro $5/emp/mo |
|---|---|---|---|
| Employees | 2 max | Unlimited | Unlimited |
| Clock in/out + GPS | ✓ | ✓ | ✓ |
| Scheduling + CSV | ✓ | ✓ | ✓ |
| Pay estimates | ✓ | ✓ | ✓ |
| Dark mode | ✓ | ✓ | ✓ |
| Geofence | ✗ | ✓ | ✓ |
| Multi-location | ✗ | ✓ | ✓ |
| Recurring schedules | ✗ | ✓ | ✓ |
| Overtime alerts | ✗ | ✓ | ✓ |
| Break compliance | ✗ | ✓ | ✓ |
| Open shifts + swaps | ✗ | ✓ | ✓ |
| Shift confirmation alerts | ✗ | ✓ | ✓ |
| In-app, email & push notifications | ✗ | ✓ | ✓ |
| PTO balances & accrual | ✗ | ✓ | ✓ |
| Exception inbox | ✗ | ✓ | ✓ |
| Employee availability | ✗ | ✓ | ✓ |
| Timesheet approvals | ✗ | ✓ | ✓ |
| Kiosk mode | ✗ | ✓ | ✓ |
| Tasks & documents | ✗ | ✓ | ✓ |
| Workplace announcements | ✗ | ✓ | ✓ |
| Tips tracking | ✗ | ✓ | ✓ |
| Paid break setting | ✓ | ✓ | ✓ |
| Payroll runs (lock & export) | ✗ | ✗ | ✓ |
| ADP / Gusto / QuickBooks export | ✗ | ✗ | ✓ |
| Compliance rules engine | ✗ | ✗ | ✓ |
| Skills & certifications + expiry alerts | ✗ | ✗ | ✓ |
| Labor budget & forecasting | ✗ | ✗ | ✓ |
| Scoped roles & departments | ✗ | ✗ | ✓ |
| PDF export | ✗ | ✗ | ✓ |
| Monthly attendance | ✗ | ✗ | ✓ |
Upgrading
Go to Settings → Billing and click the plan you want. You'll be taken to Stripe to enter payment. Billing is per-employee — if you have 10 employees on Starter, that's $30/month. When you add or remove employees, the billing adjusts automatically.
Monthly vs annual
On the pricing page there's a Monthly / Annual toggle. Annual billing is roughly 17% off — for a 10-employee Starter team, paying monthly works out to $360/year, while annual is closer to $300. Existing monthly subscribers can switch via Manage Billing in the Stripe portal.
Paid breaks
In Settings → Break compliance, set Paid break minutes per shift (0–60). The first N minutes of break time per shift are paid (treated as worked time on payroll); anything beyond that is unpaid. Set to 0 to make all break time unpaid.
Managing Your Subscription
Click Manage Billing in Settings to access the Stripe portal where you can update your card, view invoices, or cancel.
Profile & Dark Mode
Go to Profile to:
- Update your name and phone number
- Toggle dark mode on or off (available on all plans)
- Change your password (must include uppercase, lowercase, number, and special character)